Perhaps I’m dating myself, but I still remember when the fax machine (or the facsimile machine,
as it was called back then) was the hottest thing around—the new kid on
the telecommunications block. How amazing it seemed that we could send a
letter or memo or even a picture through the phone lines and have it
emerge seconds later across town or even across the country. Sure, the
fax that came slithering out the other end was a little fuzzier than the
original, and certainly a lot slimier, but it sure beat using the post
office.
The faxing fad has come and gone, and with so many
other ways to share documents nowadays (email, the web, SharePoint
sites, and so on), faxing is becoming increasingly rare. But reports of
the demise of the fax have been greatly exaggerated, which is why
Windows Home Server continues to provide fax services.
Most Windows clients come with some faxing
capabilities built in, but Windows Home Server does them one better by
enabling you to share a fax with the network and to route incoming faxes
to an email address.
1. Adding the Fax Server Role
If you want to get into the fax fast lane, look no
further than the Fax Server role. If you haven’t yet added this role to
your server, follow these steps to install it:
1. | Log on to the Windows Home Server desktop.
|
2. | Click the taskbar’s Server manager icon to open the Server Manager window.
|
3. | Click Roles.
|
4. | Click Add Roles. The Add Roles Wizard appears.
|
5. | Click Next. The wizard asks which role you’d like to install.
|
6. | Activate
the Fax Server check box. The wizard asks if you want to add the Print
and Document Services role, and the Print Server role, both of which are
required for the Fax Server.
|
7. | Click Add Required Role Services. The wizard selects the required roles.
|
8. | Click Next. The wizard displays introductory information about the Fax Server role.
|
9. | Click Next. The wizard prompts you to specify users or groups that will be allowed to use the fax service.
|
10. | The
Administrator account is added by default, and you probably don’t need
to add any other users and groups, so just click Next. The wizard asks
you to specify who can access the Fax Server’s Inbox.
|
11. | Select
the All Users Can Access the Fax Server Inbox option, and then click
Next. The wizard displays introductory information about the Print and
Document Services role.
|
12. | Click Next. The wizard prompts you to select services for the Print and Document Services role.
|
13. | Make sure the Print Server role service is selected, and then click Next.
|
14. | Click Install. The wizard installs the Fax Server and Print and Document Services roles.
|
15. | Click Close.
|
2. Configuring a Shared Fax Printer
You can send faxes directly from Windows Home Server
using the Windows Fax and Scan application. However, if you want network
users to also be able to send faxes through the Fax Server, you need to
configure and share a fax printer.
First, follow these steps to create a fax printer:
1. | Select Start, All Programs, Windows Fax and Scan. The Windows Fax and Scan window appears.
|
2. | Select Tools, Fax Accounts to open the Fax Accounts dialog box.
|
3. | Click Add to launch the Fax Setup Wizard.
|
4. | Click Connect to a Fax Modem. The wizard prompts you to enter a name for the fax modem.
|
5. | Edit the default name, if you feel like it, and then click Next. The wizard asks you to select how you want to receive faxes.
|
6. | Click
Answer Automatically, which configures the fax modem to answer incoming
calls after five rings. If you prefer to control when the fax modem
answers incoming calls, click Notify Me, instead. The wizard adds your
fax modem to the Fax Accounts dialog box.
|
7. | Click Close.
|
Next, follow these steps to share the fax printer:
1. | Select Start, Devices and Printers to open the Devices and Printers window.
|
2. | In the Printers and Faxes group, right-click Fax and then click Printer Properties. The Fax Properties dialog box appears.
|
3. | Click the Sharing tab.
|
4. | Activate the Share This Printer check box.
|
5. | Edit the default Share Name, if needed.
|
6. | Click Additional Drivers.
|
7. | Activate the ×86 check box, and then click OK. Windows Home Server prompts you to specify the location of the printer drivers.
|
8. | Click Browse, navigate to a 32-bit Windows client, open the %WinDir%\System32\DriverStore\FileRepository folder, open the folder with the name that begins with prnms002.inf_x86, click prnms002.inf, and then click Open.
|
9. | Click OK. Windows Home Server installs the extra printer drivers.
|
10. | Click Close.
|
3. Starting the Fax Service Manager
You begin your faxing duties at the Fax Service
Manager, which you open by selecting Start, Administrative Tools, Fax
Service Manager. The first time you do this, the Fax Configuration
Wizard appears. The next section takes you through this wizard’s steps.
4. Configuring the Fax Modem
Follow these steps to use the Fax Service Manager to configure the fax modem:
1. | In the Fax Service Manager, open the Devices and Providers, Devices branch.
|
2. | Right-click the fax modem, and then click Properties. The fax modem’s property sheet appears.
|
3. | (Optional) Enter a description for the fax modem.
|
4. | If you want to use the fax modem to send faxes, activate the Send Faxes check box.
|
5. | Use the Transmitting Subscriber ID (TSID) text box to type the sending ID (such as your name or your company name).
Note
Windows Home Server assigns a name to your fax
machine. This is known in the trade as the TSID—Transmitting Subscriber
Identification (or sometimes Transmitting Station Identifier). When the
other person receives your fax, your TSID is displayed at the top of
each page. If the other person is receiving on a computer, the TSID
appears in the TSID line (or some similar field, depending on the
program the recipient is using). Unfortunately, the default TSID in
Windows Home Server is Fax, which redefines the word uninspiring.
To fix this, edit the TSID as described in step 5. For example, it’s
common to change it to a name—such as your company name, your department
name, or your own name—followed by your fax number.
|
6. | If you want to use the fax modem to receive faxes, activate the Receive Faxes check box.
|
7. | Use
the Called Subscriber ID (CSID) text box to type the receiving ID,
which is used to identify your computer to the fax sender. This isn’t as
important as the TSID, so enter whatever you like (or leave the
default).
|
8. | Select the way you want incoming faxes to be handled:
| Manual Answer | Activate this option to answer incoming calls manually . | | Automatic Answer | Activate this option to have the Fax Server answer incoming calls automatically . Use the Rings Before Answering field to specify the number of rings. |
|
9. | Click OK.
|
5. Starting Windows Fax and Scan
You’ll do most of your server-based fax work using
Windows Fax and Scan, which you load by selecting Start, All Programs,
Windows Fax and Scan. Figure 1 shows the Windows Fax and Scan window.
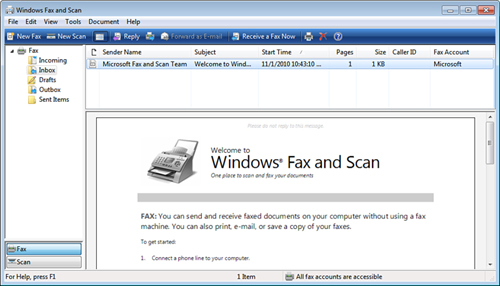
Windows Fax and Scan includes five folders that store fax-related things:
| Incoming | This
folder displays information about the fax that is currently being
received. For example, during fax reception, the Status column displays In progress and the Extended Status column displays Answered and then Receiving. |
| Inbox | This
folder stores the incoming faxes that were received successfully. Note
that the TSID column shows the name or phone number of the sender. |
| Drafts | This folder stores data faxes that you’re working on but haven’t yet sent. |
| Outbox | This folder stores data about the fax that is currently being sent. For example, during the send, the Status column displays In progress and the Extended Status column displays Transmitting. |
| Sent Items | This folder stores a copy of the faxes that you have sent successfully. |